


Blog
How to choose a 3D bioprinter: a practical guide from experiment to platform
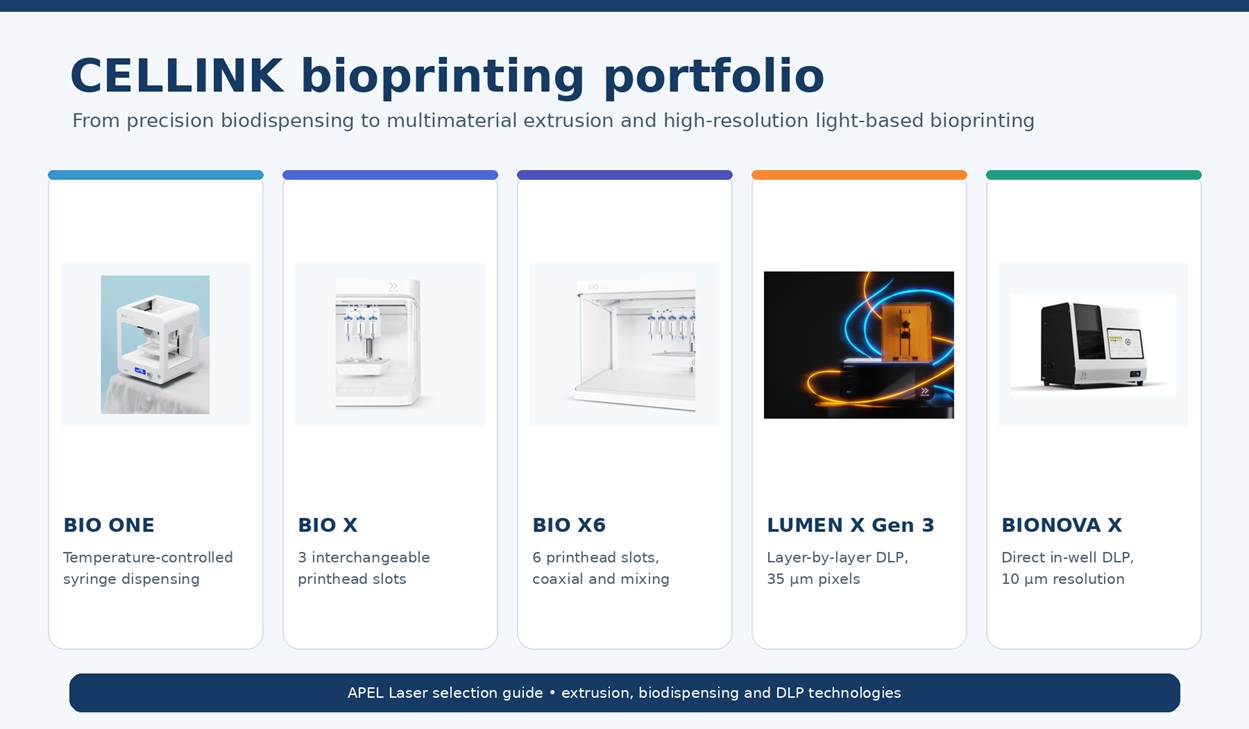
Choosing a bioprinter should start with the experiment—not with the longest instrument specification. A platform that is ideal for collagen droplet arrays may be unnecessarily complex for routine 3D cell culture, while an extrusion system may not provide the speed or feature control required for a light-based microfluidic construct.
This guide compares five complementary approaches available from APEL Laser: precision biodispensing with BIO ONE, modular extrusion with BIO X, advanced multimaterial extrusion with BIO X6, benchtop DLP with LUMEN X and direct-in-well DLP with BIONOVA X. It also shows how bioink choice and a realistic first experiment should influence the final configuration.
The short answer
| If your priority is… | Start by evaluating… | Typical first experiment |
| Reproducible dispensing of collagen, Matrigel or another temperature-sensitive matrix | BIO ONE | Droplet-array precision followed by a cell-laden 3D matrix culture |
| Flexible extrusion with up to three materials or tools | BIO X | Hydrogel lattice printability and post-print cell viability |
| Coaxial, mixing or complex multimaterial biofabrication | BIO X6 | Core-shell filament or sacrificial-channel feasibility study |
| Detailed, relatively large light-cured scaffolds or microfluidic structures | LUMEN X | Exposure matrix followed by a resolution and stiffness study |
| High-throughput, direct-in-well light-based printing | BIONOVA X | Repeated constructs in a 24- or 96-well assay plate |
This is only an initial filter. Cell type, matrix chemistry, construct dimensions, crosslinking, throughput and downstream analysis must be considered together.
Begin with six experimental questions
Before comparing instruments, define:
- What biological question will the model answer? A disease model, organoid-support matrix, tissue scaffold, drug screen and material-development project require different levels of complexity.
- What geometry is actually needed? Droplets, simple lattices, layered tissues, perfusable channels, microwells and fine microarchitectures are not equivalent printing tasks.
- Which materials and cells will be used? Viscosity, gelation, temperature sensitivity, cell density and crosslinking chemistry often decide the printing method.
- How many materials or cell populations must be placed independently? This separates single-syringe dispensing from three- or six-tool extrusion.
- What throughput is meaningful? A large construct, a few customized models and a 96-well screening plate lead to different choices.
- How will success be measured? Define print fidelity, viability, phenotype, mechanical properties and reproducibility before selecting the platform.
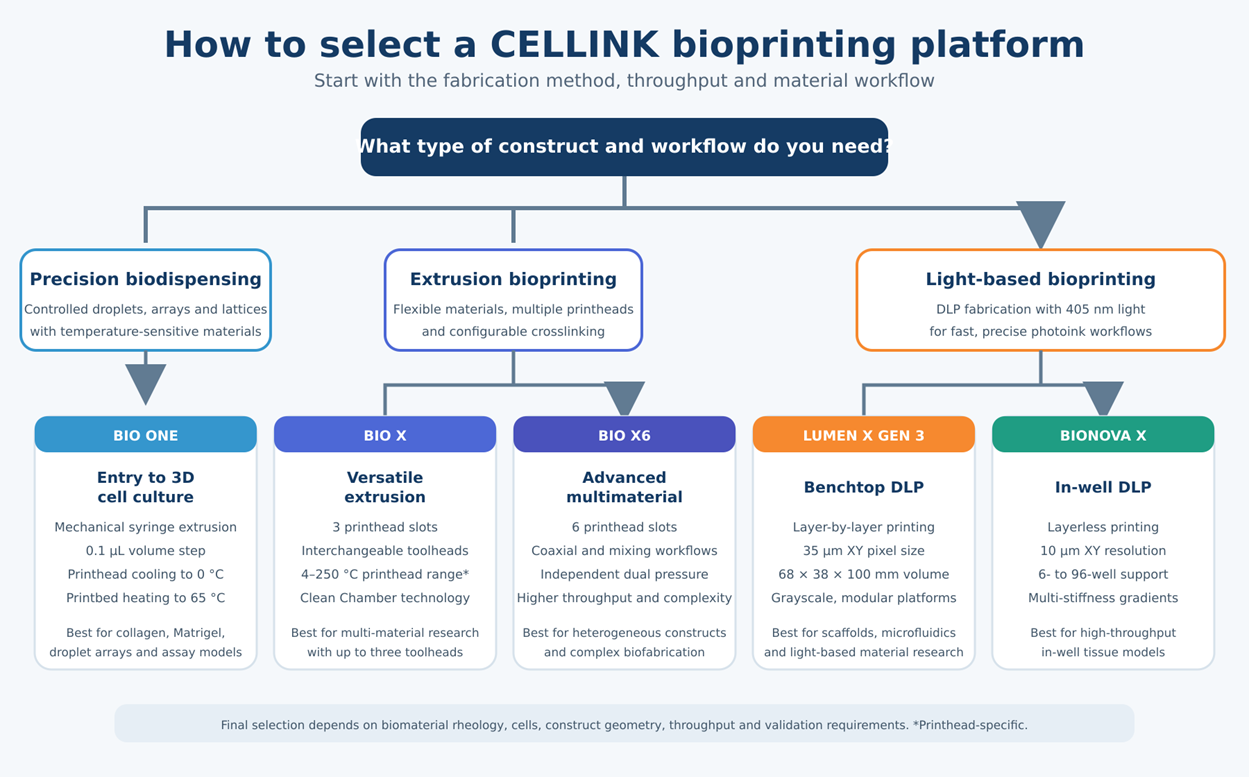
BIO ONE: when the experiment needs controlled dispensing, not maximum complexity
BIO ONE is the most direct option for laboratories moving from manual hydrogel handling toward reproducible 3D cell culture. Its mechanically driven syringe extrusion, active printhead cooling and heated printbed make it particularly relevant for collagen, Matrigel and other temperature-sensitive materials.
Best suited to
- droplets, arrays, rings and simple lattices;
- collagen-rich matrices and temperature-sensitive hydrogels;
- organoid or spheroid embedding;
- contraction assays and repeated matrix-culture models;
- groups that want accessible protocol development with controlled dispensed volume.
Relevant material routes
Collagen families such as TeloCol, PureCol, VitroCol and FibriCol are logical starting points, together with HyStem hydrogels or validated user-developed matrices. Material selection should follow the cell model and required stiffness rather than the instrument name.
Potential first experiments
- Print an acellular droplet array across a multi-well plate and quantify volume consistency, position and gel stability.
- Repeat the optimized geometry with cells, then compare viability and morphology at 24 and 72 hours against manually prepared controls.
- For an organoid workflow, compare automated versus manual placement of Matrigel or collagen domes and measure dome geometry, organoid recovery and assay variability.
Choose a modular extrusion platform instead if the project will soon require several independently placed materials, thermoplastic support or complex tool changes.
BIO X: the balanced platform for versatile extrusion research
BIO X Gen 3 is the general-purpose choice for laboratories that need flexible extrusion and up to three interchangeable printheads or tools. It can combine cell-laden hydrogels, structural or sacrificial materials and process-specific crosslinking in one protocol.
Best suited to
- multimaterial and multicellular constructs using up to three tool positions;
- tissue engineering, disease models and bioink development;
- temperature-controlled, pneumatic, mechanical or thermoplastic extrusion;
- laboratories that need an open material platform without starting with six printheads.
Relevant material routes
General-purpose CELLINK Bioink or CELLINK RGD can support early method development. GelMA, GelXA, alginate and collagen-based systems are useful when crosslinking or matrix composition matters. Tissue-specific formulations can provide a starting point for bone, cartilage, skin, vascular, liver, neural or stem-cell models. Custom formulations can be developed from stock solutions or lyophilized base materials.
Potential first experiments
- Run an acellular printability study varying pressure, speed and nozzle size; score filament continuity, pore geometry and shape retention.
- Print a simple cell-laden lattice with the selected bioink and measure immediate and 24-hour viability before evaluating proliferation or phenotype.
- Combine a structural material with a cell-laden hydrogel to test a hybrid scaffold or sacrificial-channel workflow.
BIO X is usually the sensible default when the future research programme is varied but three loaded tools are sufficient.
BIO X6: when the construct requires more materials, cells or process steps
BIO X6 extends the modular extrusion concept to six printhead positions and supports coaxial and mixing workflows with independent pressure control. Its value is not simply “more printheads”; it is the ability to integrate more operations without repeatedly stopping and reconfiguring the process.
Best suited to
- heterogeneous or layered tissue models;
- coaxial and core-shell structures;
- mixing of components during deposition;
- sacrificial channels and perfusable architectures;
- workflows combining several cell populations, hydrogels and crosslinking steps.
Relevant material routes
The workflow may combine tissue-specific bioinks with a structural or sacrificial material, or use different hydrogel compositions for distinct biological regions. For example, a vascular model may pair a cell-laden matrix with a channel-forming material; a tissue interface may require two matrices with different stiffness or extracellular-matrix cues.
Potential first experiments
- Establish a coaxial acellular filament and quantify core continuity, shell thickness and diameter across flow-rate combinations.
- Print a sacrificial channel inside a cell-compatible bulk matrix, remove the sacrificial phase and test channel patency.
- Create a two-region construct using different materials or cell populations and assess placement accuracy, viability and interface stability.
BIO X6 is justified when the experimental architecture genuinely benefits from the additional tools, coaxial capability or reduced manual reconfiguration. Otherwise, BIO X may be the more efficient starting point.
LUMEN X: light-based fabrication for detailed scaffolds and material development
LUMEN X Gen 3 uses 405 nm digital light processing to cure each image layer across the build area. It is relevant when fine internal geometry, rapid layer exposure, a relatively large Z range or controlled light-based material research is more important than nozzle-based material placement.
Best suited to
- porous scaffolds and complex hydrogel architectures;
- microfluidic and perfusable structures;
- grayscale exposure and spatial stiffness modulation;
- photoink development;
- projects requiring flexible build platforms rather than direct printing in standard assay wells.
Relevant material routes
PEGDA- and GelMA-based photoinks are useful starting points, including PEGDA Soft, PEGDA X and GelMA photoink families. Custom photoinks require control of polymer concentration, photoinitiator, absorber, exposure and cell compatibility. The complete optical process—not only the base polymer—determines the result.
Potential first experiments
- Print an acellular exposure matrix to identify the working window for dose, layer thickness and feature fidelity.
- Measure the smallest repeatable channels or pores, then evaluate swelling and mechanical stability after equilibration.
- Introduce cells only after the exposure window is defined; compare viability and function across the lowest practical light doses.
LUMEN X is preferable to an extrusion platform when projected-light fabrication provides a genuine advantage in geometry or speed.
BIONOVA X: direct-in-well DLP for replicated tissue models and screening
BIONOVA X is designed for high-resolution, direct-in-well light-based bioprinting. Printing directly in 6-, 12-, 24- or 96-well plates can reduce transfers and align fabrication with culture, imaging and plate-based assays.
Best suited to
- repeated tissue or disease models in multi-well plates;
- drug-response and precision-medicine studies;
- microarchitectures, microwells and controlled cell environments;
- stiffness gradients and spatially varied crosslinking;
- workflows where replicate count and downstream assay compatibility are central.
Relevant material routes
BIONOVA X photoink families include PEGDA-, alginate-, gelatin- and hyaluronic-acid-based options. Choose the formulation according to the biological model, stiffness, swelling, degradation and exposure window. A material that provides the highest resolution is not automatically the best cell matrix.
Potential first experiments
- Print the same acellular geometry across a 24- or 96-well plate and quantify dimensional variation by well position.
- Establish a cell-laden construct, then measure viability, morphology and assay signal uniformity across the plate.
- Print two exposure conditions or stiffness regions and study cell response to the controlled mechanical microenvironment.
Choose BIONOVA X over LUMEN X when direct-in-well throughput and assay integration are more valuable than a larger general-purpose build volume.
The bioink is part of the instrument decision
The CELLINK bioinks and biomaterials portfolio includes ready-to-use bioinks, tissue-specific formulations, photoinks, stock solutions, lyophilized materials and process reagents. Selection should consider:
- cell compatibility and biological cues;
- rheology and shape fidelity;
- extrusion pressure or optical exposure;
- crosslinking mechanism and cytocompatibility;
- stiffness, diffusion, swelling and degradation;
- construct geometry and culture duration;
- batch consistency, sterility and preparation effort.
Ready-to-use materials are useful when reproducibility and faster setup matter. Base materials are more appropriate when the research question requires control of formulation, concentration or crosslinking. Tissue-specific bioinks can narrow the search, but do not replace validation with the laboratory’s own cells and culture conditions.
A realistic three-stage first project
Regardless of platform, a strong feasibility project separates technical and biological variables:
- Acellular process window: establish dispensing or exposure parameters, geometry, repeatability and post-print stability.
- Cell-laden confirmation: use the smallest practical experimental matrix to evaluate process-related viability and distribution.
- Biological validation: measure the application-specific phenotype or function and repeat the experiment across independent runs.
The result should be a transferable protocol with defined materials, cells, geometry, hardware, parameters, acceptance criteria and quality-control measurements—not merely one attractive construct.
Frequently asked questions
Which bioprinter is best for a laboratory starting with 3D cell culture?
BIO ONE is a strong entry point for controlled dispensing and temperature-sensitive matrices. BIO X is more appropriate when the laboratory expects to develop varied extrusion methods or use several materials and tools.
What is the main difference between extrusion and DLP bioprinting?
Extrusion places material through a nozzle and offers broad material and multimaterial flexibility. DLP cures patterned regions of a photoactive material with projected light and can provide faster layer fabrication and finer optical control. The material chemistry and biological model often determine which advantage matters.
BIO X or BIO X6?
Choose BIO X when up to three tool positions cover the workflow. Choose BIO X6 when six loaded tools, coaxial structures, mixing or a more complex multimaterial sequence provides a clear experimental benefit.
LUMEN X or BIONOVA X?
Choose LUMEN X for flexible benchtop DLP, a larger general-purpose build range and material-development workflows. Choose BIONOVA X for high-resolution direct-in-well fabrication and replicated plate-based experiments.
Can researchers use their own bioinks?
The platforms support open-material research, but each formulation must be validated for the selected dispensing or optical process, hardware, cells and construct.
Discuss your experiment before selecting the configuration
For a useful recommendation, send APEL Laser:
- the cell type and biological objective;
- preferred biomaterial or current formulation;
- target geometry and approximate dimensions;
- number of materials or cell populations;
- desired plate or culture format;
- required replicate count;
- planned imaging, mechanical testing or biological readout.
Request a bioprinter selection discussion or contact APEL Laser.

